Since 2018, GitHub Actions has emerged as a great choice for Continuous Integration (CI) due to its proximity to your code. Develocity is a popular technology for speeding up builds and gaining insights that can be used to make troubleshooting more efficient and toolchains more reliable. This post will explain how to integrate these technologies. Specifically, we will walk you through how to set up your Maven project builds using GitHub Actions and Develocity.
TL;DR: To quickly optimize your project, create a Develocity [access key] and add an [environment variable] to your GitHub Actions YAML file.
Understanding GitHub Actions and Develocity
Let’s start with a quick overview of these tools before diving into the setup process.
GitHub Actions is a CI platform offered by GitHub, enabling you to automate your workflows. It allows for the compilation, testing, and deployment of your code based on specific events, such as a code push or a pull request.
Develocity is a powerful build acceleration and insights tool designed to improve productivity and enhance your Gradle or Apache Maven build experience. It can significantly reduce build time through features like caching and distributed test execution, facilitate troubleshooting, and improve toolchain reliability through better build and test observability.
Setting up a project with GitHub Actions
This post assumes you have a basic understanding of GitHub Actions. If not, I’d suggest reading GitHub Actions with Java first and then returning here.
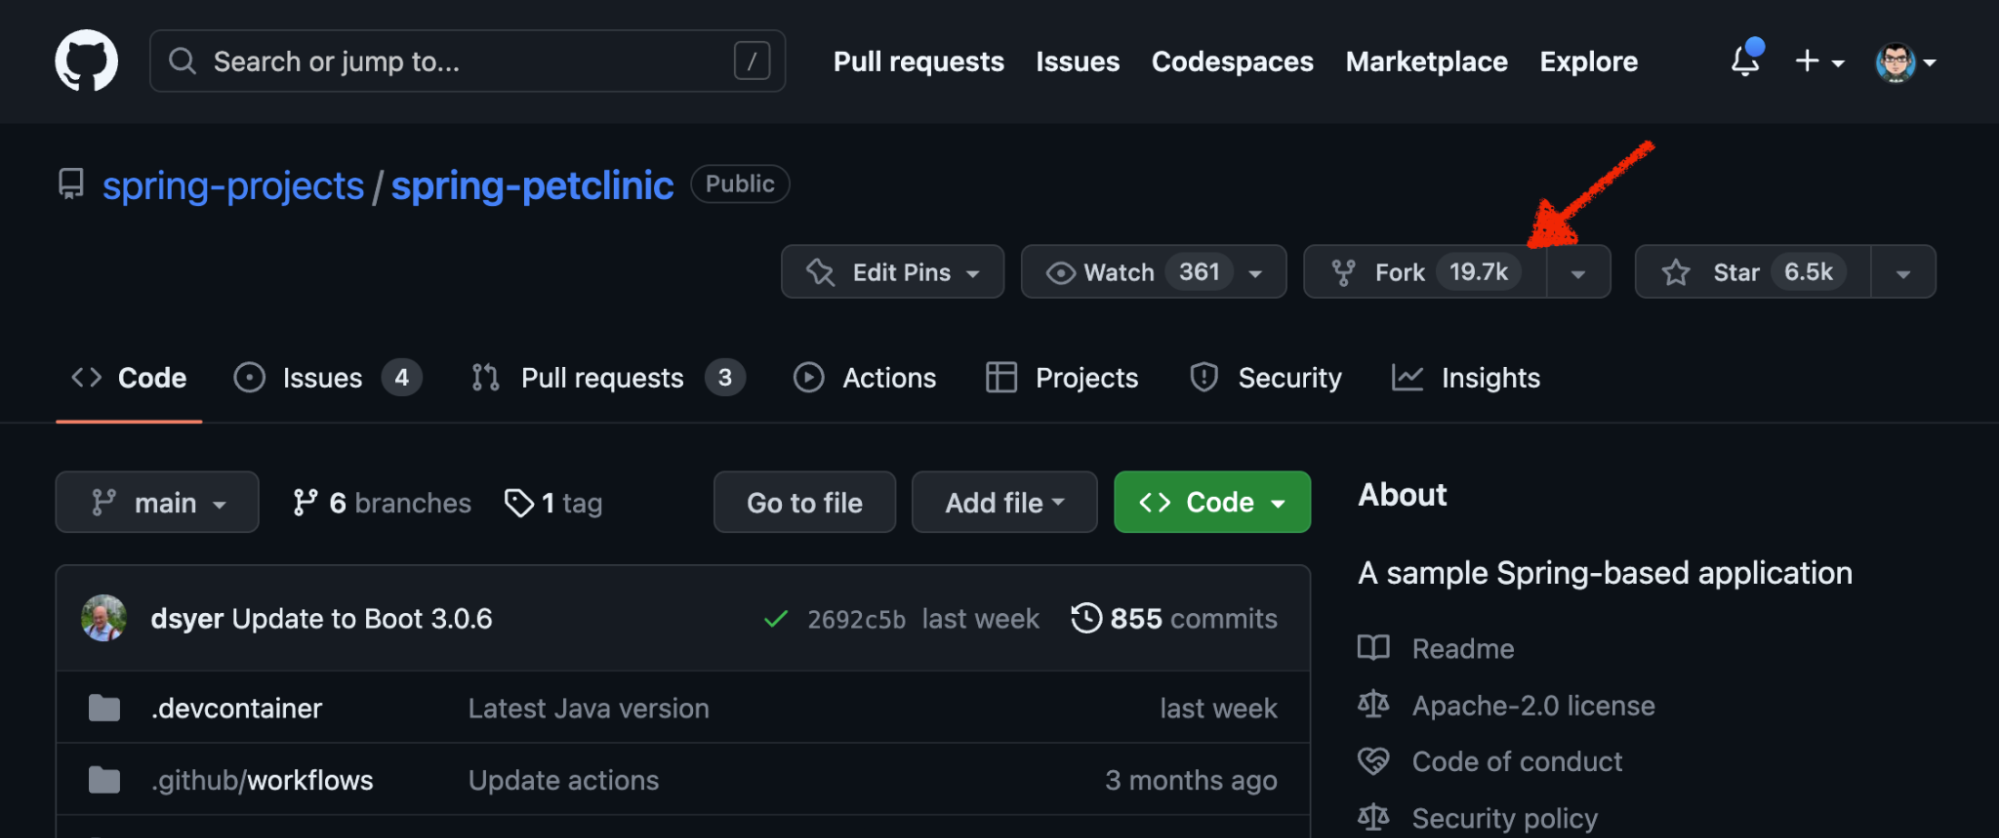
We’ll use an existing project, the Spring Boot Pet Clinic, for demonstration purposes. This example application helps you learn about Spring Boot using real-world patterns. The project includes both Maven and Gradle build files and is configured for GitHub actions. To get started, fork the project!
Start by navigating your browser to the Spring Boot Pet Clinic and clicking the Fork button.
Navigate your browser to Spring Boot Pet Clinic and press the Fork button.
Due to security considerations, GitHub Actions aren’t automatically run for forked repositories. Enable them by clicking on the Actions tab and pressing the I understand my workflows, go ahead and enable them button.
After forking the project, clone the repo:
git clone https://github.com/{username}/spring-petclinic.git
NOTE: Replace {username} with your GitHub username or the organization into which you forked the project.
Now, open the project in your favorite IDE!
Accelerating builds with Develocity caching
Adding a cache is one of the simplest ways to speed up any build. Build caching can accelerate CI and local developer builds. A remote build cache populated by CI can help future local developer builds utilize the latest cache entries—so a developer could clone a project for the first time and immediately benefit from the build cache.
Develocity integrates with Maven using a Core Extension. This extension is defined in a .mvn/extensions.xml file. Create this file with the following contents:
<extensions>
  <extension>
    <groupId>com.gradle</groupId>
    <artifactId>gradle-enterprise-maven-extension</artifactId>
    <version>1.17.2</version>
  </extension>
  <extension>
    <groupId>com.gradle</groupId>
    <artifactId>common-custom-user-data-maven-extension</artifactId>
    <version>1.11.1</version>
  </extension>
</extensions>
The above XML file defines two extensions. The first one, gradle-enterprise-maven-extension, allows Maven to connect to Develocity, enabling build scanning and caching. The second extension, common-custom-user-data-maven-extension, adds environment and CI information to the Build Scan.
Configure Develocity by creating a .mvn/gradle-enterprise.xml file with the following content:
<gradleEnterprise>
  <server>
    <!-- Your Develocity URL -->
    <url>https://ge.example.com</url>
  </server>
  <buildScan>
    <capture>
      <!-- Enable recording detailed build information -->
      <goalInputFiles>true</goalInputFiles>
      <buildLogging>true</buildLogging>
      <testLogging>true</testLogging>
    </capture>
    <!-- Upload the build scan synchronously for CI -->
    <backgroundBuildScanUpload>#{isFalse(env['GITHUB_ACTIONS'])}</backgroundBuildScanUpload>
  </buildScan>
  <buildCache>
    <local>
      <!-- Disable local cache for ephemeral CI agents -->
      <enabled>#{isFalse(env['GITHUB_ACTIONS'])}</enabled>
    </local>
    <remote>
      <!-- Enable remote cache publishing from CI agents -->
      <enabled>true</enabled>
      <storeEnabled>#{isTrue(env['GITHUB_ACTIONS'])}</storeEnabled>
    </remote>
  </buildCache>
</gradleEnterprise>
IMPORTANT: Replace https://ge.example.com with your Develocity URL.
You can test these changes by running a local build:
./mvnw verify
The last lines of your build will look something like this:
[INFO] Publishing build scan...
[INFO] https://ge.example.com/s/qqrqortxcnexg
Open the Build Scan in your browser to see details about the local build. However, since this post is all about getting this information for CI, let’s jump to that.
Setting up your Maven project with GitHub Actions
Setting up GitHub Actions for your Maven project involves creating a simple workflow that builds and tests your application whenever there is a push or pull request. Out of the box, the Pet Clinic GitHub Actions YAML file github/workflows/maven-build.yml, look like this:
name: Java CI with Maven
on:
  push:
    branches: [ main ]
  pull_request:
    branches: [ main ]
jobs:
  build:
    runs-on: ubuntu-latest
    strategy:
      matrix:
        java: ['17']
    steps:
      - uses: actions/checkout@v3
      - name: Set up JDK ${{matrix.java}}
        uses: actions/setup-java@v2
        with:
          java-version: ${{matrix.java}}
          distribution: 'adopt'
          cache: maven
      - name: Build with Maven Wrapper
        run: ./mvnw -B package
Two changes are needed to work with Develocity: configuring an API token and updating the run command.
- Update the “Build with Maven Wrapper” step in the
maven-build.yml. - Change the
runstep to include thecleanMaven lifecycle. Adding thecleanphase may seem unnecessary for a CI build; however, the Develocity Maven Extension only creates cache entries for clean builds. - I recommend replacing
packagewithverifyto ensure additional quality checks are run, such as Checkstyle. - One more tip you can add the
--no-transfer-progressflag to make the Maven build output less verbose; artifact download statistics are automatically captured in the Build Scan.
The full run line will be:
run: ./mvnw clean verify --batch-mode --no-transfer-progress
- Lastly, make the secret
GE_ACCESS_TOKENavailable to the step. This secret will be created in the next step.
The complete build step looks like this:
      - name: Build with Maven Wrapper
        run: ./mvnw clean verify --batch-mode --no-transfer-progress
        env:
          GRADLE_ENTERPRISE_ACCESS_KEY: ${{ secrets.GE_ACCESS_TOKEN }}
Configure a Develocity access key
You could create a Develocity access key for any user; however, we recommend making a specific CI user with reduced permissions.
- Log into your Develocity instance if you still need to create a CI user.
- Click on your profile icon in the top right corner, then click Administration -> Access control -> Add user.
Populate the new form with your chosen information; the important part is selecting the pre-configured CI Agent role.
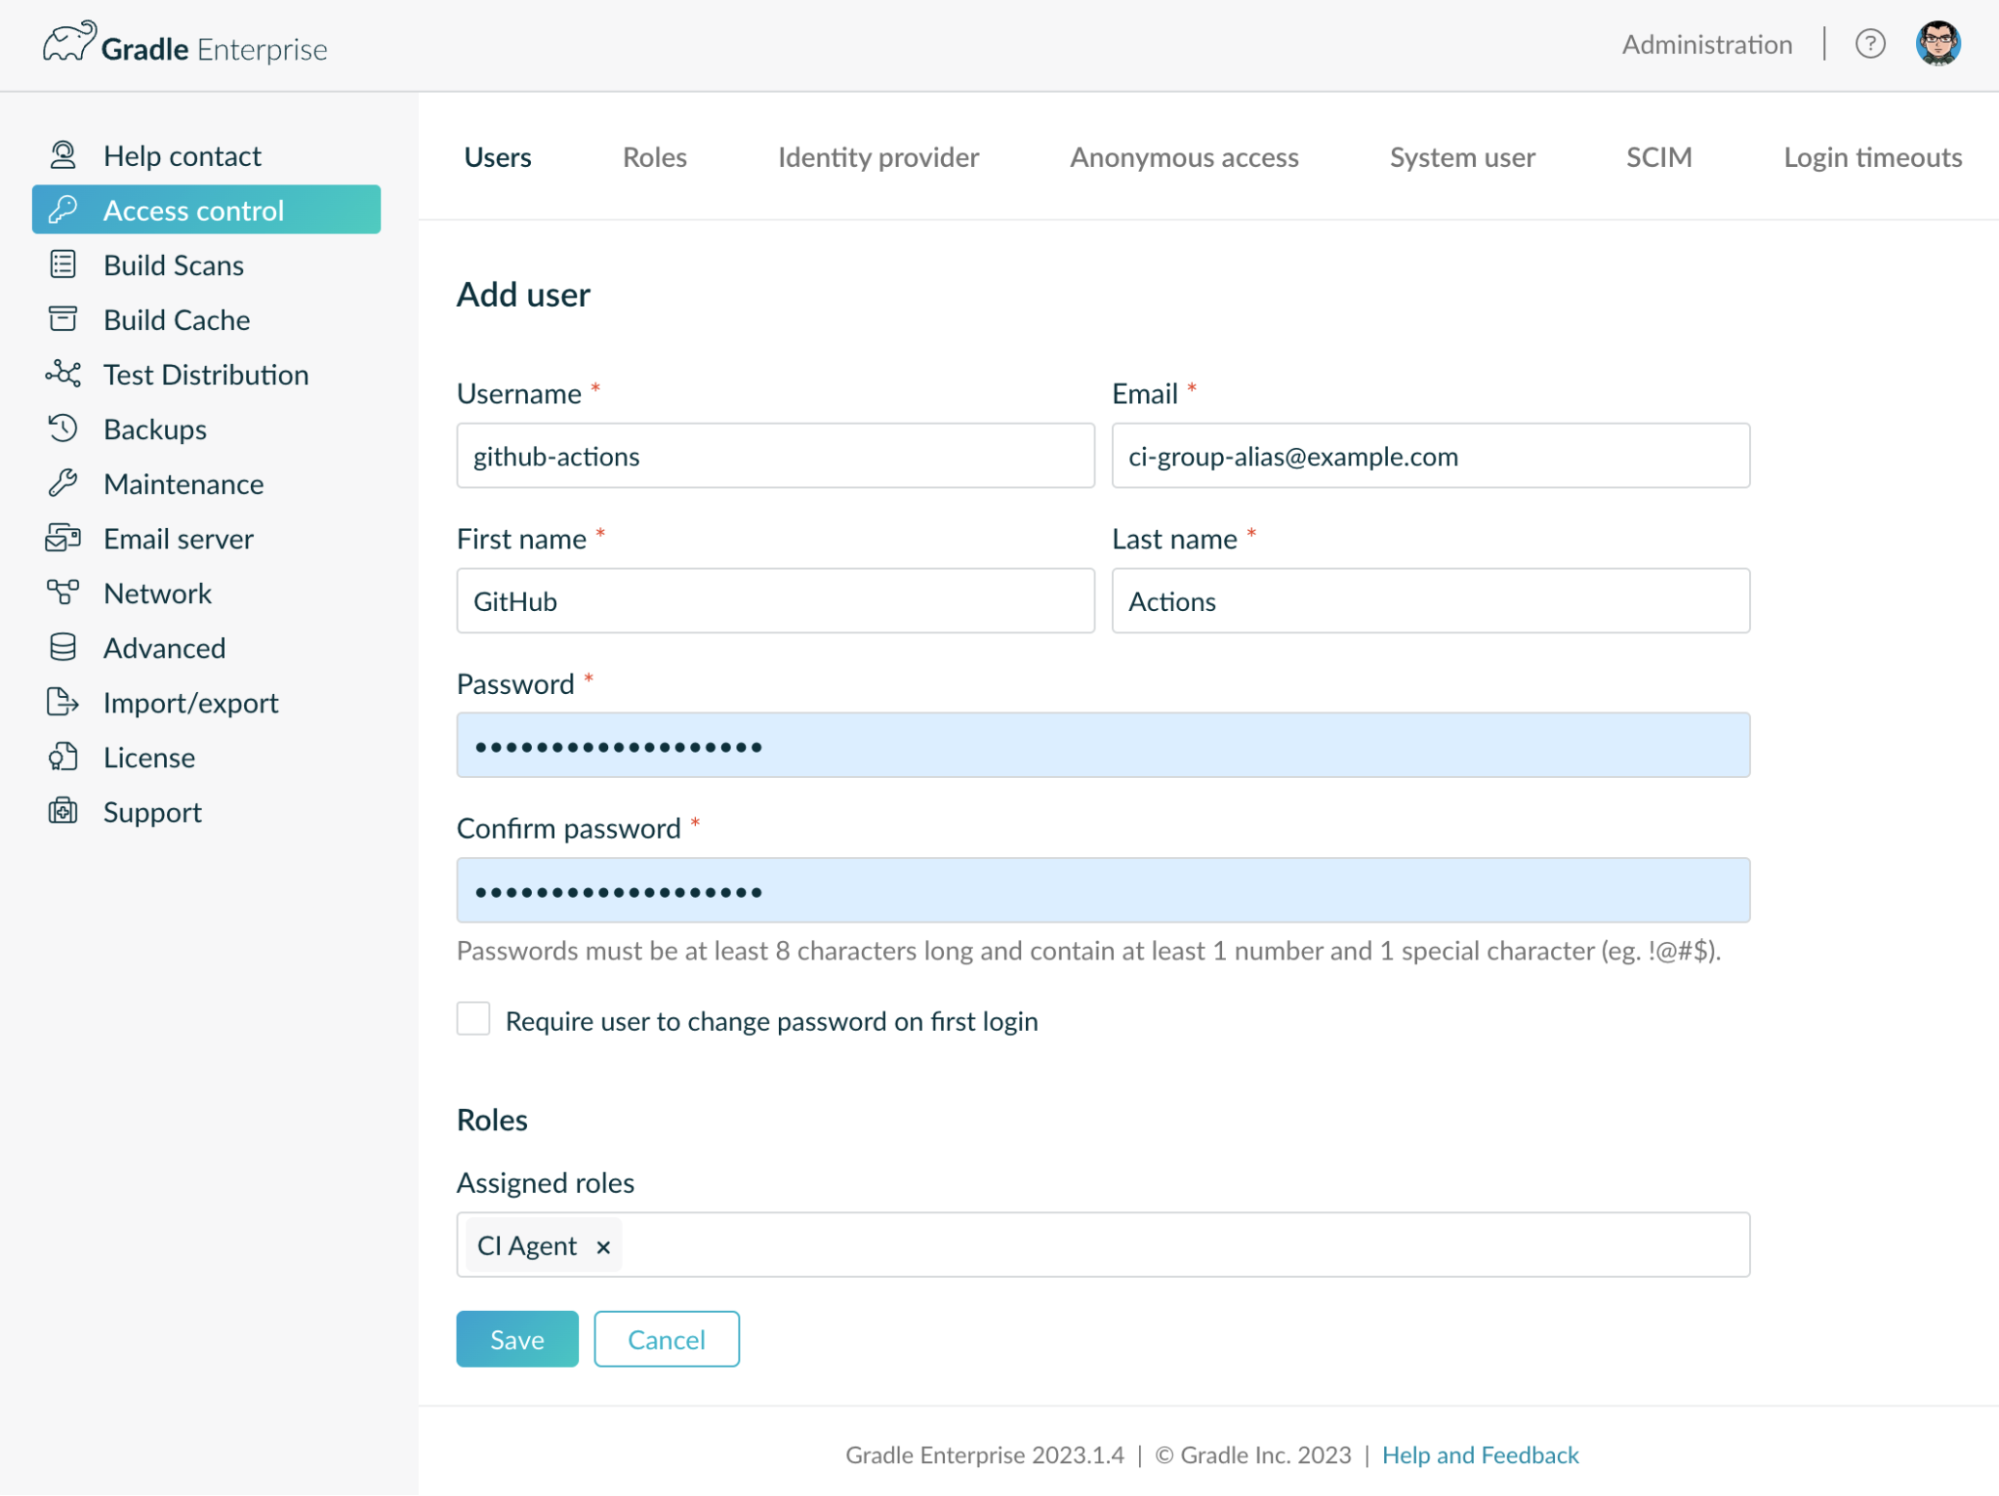
Creating a CI user in Develocity
- Remember to press the Save button!
- Open a private/incognito browser and sign into your GE instance with the CI user.
- Click on the profile icon in the top right corner, then click My Settings -> Access keys. Give the access key a descriptive name, and then click Generate.
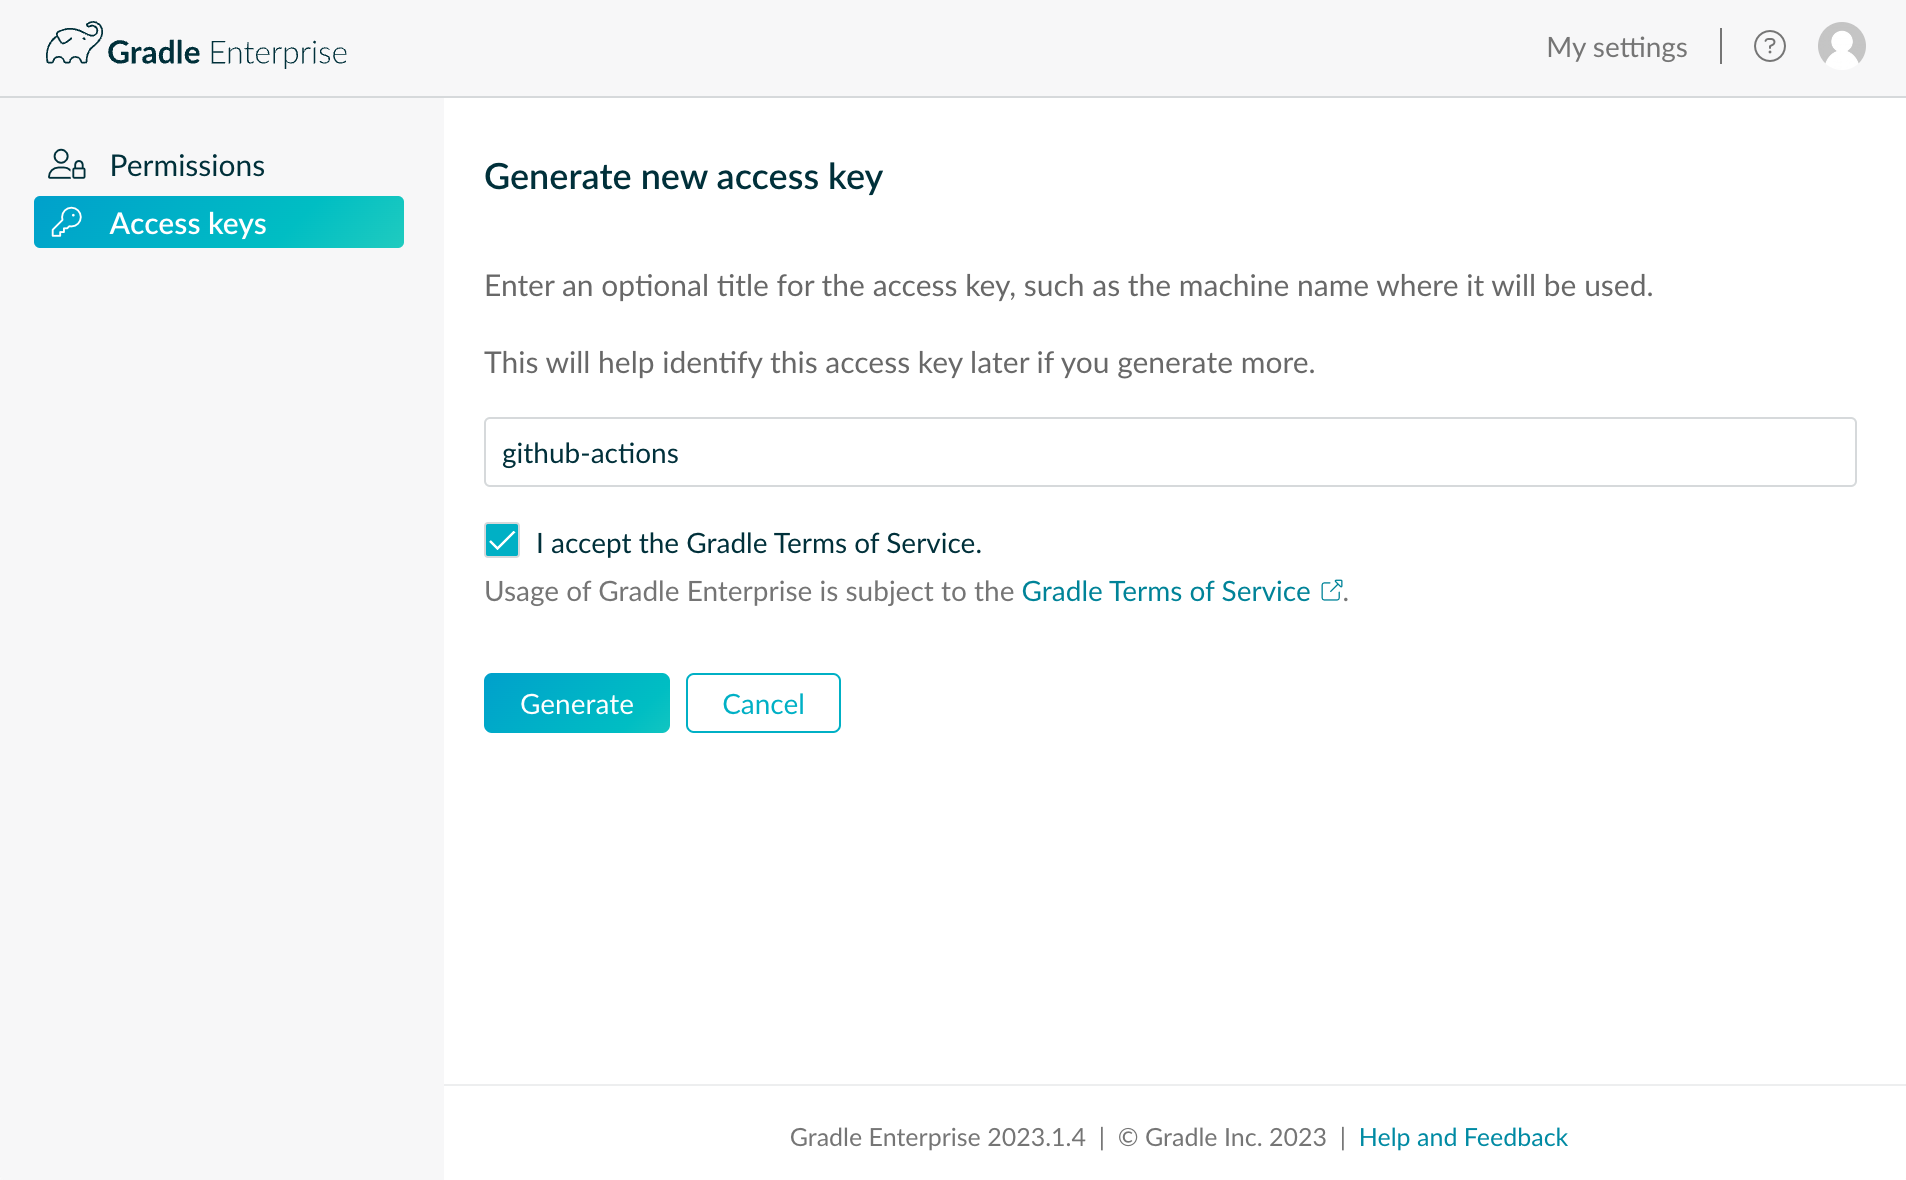
Generating a new access key in Develocity
- Be sure to record the resulting access key as this is the only time it will be displayed.
Create a GitHub secret for the access token
Navigate your browser back to your GitHub fork of Pet Clinic. Click on Settings -> Secrets and variables -> Actions -> New repository secret. Use the name GE_ACCESS_TOKEN, and the value will be the format of {ge-hostname}={access-key}, where {access-key} was the value copied from the previous step. For example, if my Develocity hostname was ge.example.com and the access key was foobar, the value of this secret would be ge.example.com=foobar. This key/value format ensures access tokens are only used for a given domain.
NOTE: The secret name of GE_ACCESS_TOKEN must match the value used in maven-build.yml, i.e., secrets.GE_ACCESS_TOKEN.
Extra Credit: Add Develocity link to GitHub Actions
As mentioned above, a link to Develocity is one of the last lines printed in the build output. A link at the end of your build output works great for local builds, but it requires you to scroll through a build log for CI builds. To fix that, I’ll add a link to the Develocity Build Scan as a job summary.
Add the following step to the maven-build.yml:
- name: Add BuildScan link to the summary
        # Don't add links to scans on forks; they don't have an access tokens
        if: github.event.pull_request.head.repo.full_name == github.repository && !cancelled()
        # The CI run custom value is automatically created by the common-custom-user-data-maven-extension, defined by .mvn/extensions.xml run: echo "🐘[Develocity BuildScan](https://events.gradle.com/scans?search.names=CI%20run&search.values=$GITHUB_RUN_ID)" >> $GITHUB_STEP_SUMMARY
NOTE: If you want to get fancy, you could add a comment to a pull requests 🎩
Commit changes and start building
Just about done! The only thing left to do is to commit and push the changes back to GitHub.
The Develocity Maven Extension generates a unique name for each workspace; this file should not be checked in; add it file to .gitignore:
echo .mvn/.gradle-enterprise/gradle-enterprise-workspace-id >> .gitignore
NOTE: Alternatively, you can open .gitignore and add .mvn/.gradle-enterprise/gradle-enterprise-workspace-id to a new line at the bottom of the file.
Use your favorite Git client to commit the changes and push them to GitHub, or use the following commands:
git add .
git commit -m "Adding Develocity to observe and speed up build"
git push origin main
Putting it all together
By combining GitHub Actions with Develocity, you can create a robust CI pipeline that’s both efficient and informative. Develocity caching accelerates your builds and Build Scan provides valuable insights to improve your development workflow. Though we used a Maven project for this example, the principles generally apply to any build system that Develocity supports. Happy coding!
Learn more about Developer Productivity Engineering
If you want to make your builds faster and earn Gradle swag, don’t miss out on the free Gradle and Maven Build Speed Challenge!
To learn more about Develocity and Developer Productivity Engineering, check out these resources: